What It Is
Well, here's a kind of party I haven't had to plan since I was a girl (a million years ago). I had a bit of trouble finding ideas for Brownie Bridging (also known as Fly Up) online, so I thought I would share what I came up with here. Bridging in Girl Scouts is when the girls move from one level to another, such as from Brownies to Juniors. It's a pretty big deal. All the families are invited to celebrate all that the girls accomplished in the past couple years, and talk about what they have to look forward to in the next level of Scouting. Being in Girl Scouts made a HUGE impact on my life and I am very happy that my daughter is loving her experience as well.
The Ceremony
Our troop's Bridging Ceremony was to take place outside at a local park. The girls learned to cook over a fire early in the day, and then the families came later for the Ceremony. Lots of ceremony ideas I saw online used candles, but I knew those would blow out in the windy great outdoors. The script I wrote uses flowers that the girls place in a vase. I patched together this script from various ideas I saw online. A Girl Scout always uses resources wisely! Here is a PDF of the Bridging Ceremony Script we used:
https://drive.google.com/file/d/0Byh3C6Lxek0gdGFBMjljLUtTSGs/view?usp=sharing
The Bridge
The actual bridging part of our ceremony was outside on a real bridge over a creek. I wanted to make it special with some decorations so the girls would like it. The decorations needed to be 1) inexpensive, 2) not damaged by rain or wind, 3) bright and cheerful. I decided on rainbow colored duct tape and a pack of multi-colored balloons. My husband was enlisted to help me wrap the duct tape around a tree, trail it across the bridge and wrap it around a stick that we stuck into the mud (there not being an appropriate tree on the other bank). We blew up the balloons and folded the duct tape with the balloon knot in the middle to suspend everything over the creek. This worked well as there was no railing on our bridge. If the bridge had a railing, it may have been even easier to decorate with balloons. I didn't feel like we had to go crazy with decorations - I mean, we were outside and natural beauty surrounded us. But the balloons and bright tape did make it more fun for the girls to run across the bridge and into their future of Junior Girl Scouting. Of course, we removed all trace of the decorations when we left the site. (Take only photographs, leave only footprints!)
Don't Forget
- Recognize your leaders and parent volunteers.
- Let the girls help plan the ceremony - who has what part, what songs to sing, etc.
Practical tips, tricks, recipes, and decoration ideas to help you throw a kick-ass party.
Tuesday, May 2, 2017
Friday, May 1, 2015
Baby Shower Must-Take Photos
When you host a baby shower for a friend, make sure you enlist someone to document the big day through photography. The mom-to-be is going to be too busy socializing to take her own photos, but you know she will want to remember this party! You don't need professional photography, but get a guest with a reliable camera who isn't shy about asking people to pose and smile. Of course, you can do it yourself if you have time between all your hosting duties!
Food Photos
| Pretend there is a comma between "Welcome" and "Simon". Unless this cake is actually issuing a command for us to welcome Simon. Hmm... |
| I'm not saying that Oreos covered with chocolate stamped with little ducks are the cutest baby shower favor you will ever see in your life, but seriously, they've gotta be in the top 5. |
| Yogurt bars are THE BEST for brunch time showers. And check out that low-cost and adorable flag banner! |
Special Gifts
| This thoughtful guest made a banner for the new baby's room. It's sweet to get a photo of the gift and the giver. |
Fun Group Shots
It's likely that the gang doesn't get together very often. A group photo like this will be treasured by the new mom! Try to think of a cute place to take the photo. And take a few to make sure everyone has their eyes open.
Guests Having Fun
Mix it up with candid and posed shots.
| Guests decorate wooden blocks with paint markers for the baby. Hey, a shower activity that doesn't embarrass anyone! Awesome! |
With the Host
| You hosted this amazing party! Make sure you get a nice photo with the guest of honor. #friendsforever |
Next Step - Don't forget to give the mom-to-be copies of your photos!!
Friday, April 26, 2013
Prisoners of Love Bridal Shower
I recently had the honor of hosting a bridal shower for my friend. She works as a Victim Advocate and is marrying an Assistant Prosecuting Attorney. So, these are two people who have dedicated their careers to catching criminals and getting justice for victims of crime. I thought a law enforcement themed bridal shower would be pretty fun, especially since almost everyone attending the shower would be their co-workers. The official theme of the shower was "Prisoners of Love". We had a blast!
The Invitation- As the followers of this blog know, I am a big fan of creating a PDF or image file and emailing the invitation to guests. This saves paper and maintains the integrity of your design. If this had been a more formal shower, I would have printed out the invitations and mailed them, but as we all work in the same office, email was the perfect way to get the word out. The benefit of the image file was that I could also print a couple color copies to hang in the office as a reminder.
The Activity - The guest of honor wanted NO GAMES. And, of course, I listened to the bride-to-be! But we had to have something fun to pass the time and make this more than just a luncheon with presents. It was decided to have a photo booth. I'd seen photo booths at weddings, run by professionals, but as this was a lower-budget affair, the co-host and I created our own photo booth with a twist. We made a WANTED poster out of a cardboard display board. I found a bunch of crimes - some from the Ohio Revised Code that were actual crimes, and some that we just made up for fun. The "crimes" people could choose from were: Assaulting a Police Horse, Running an Illegal Gambling Ring, Hoarding Fabulous Shoes, Doing the "Footloose" Dance in a Public Place, Swearing in Front of Women and Children, Public Intoxication, Misuse of a Public Transportation System, Driving Too Slowly, Stealing Doug's (the groom's) Heart, etc. Actually, at the shower, the bride-to-be started looking through the crimes and assigned them to different people, which in itself was pretty funny. Plenty of props were around so people could be as silly as they wanted to be.
The Invitation- As the followers of this blog know, I am a big fan of creating a PDF or image file and emailing the invitation to guests. This saves paper and maintains the integrity of your design. If this had been a more formal shower, I would have printed out the invitations and mailed them, but as we all work in the same office, email was the perfect way to get the word out. The benefit of the image file was that I could also print a couple color copies to hang in the office as a reminder.
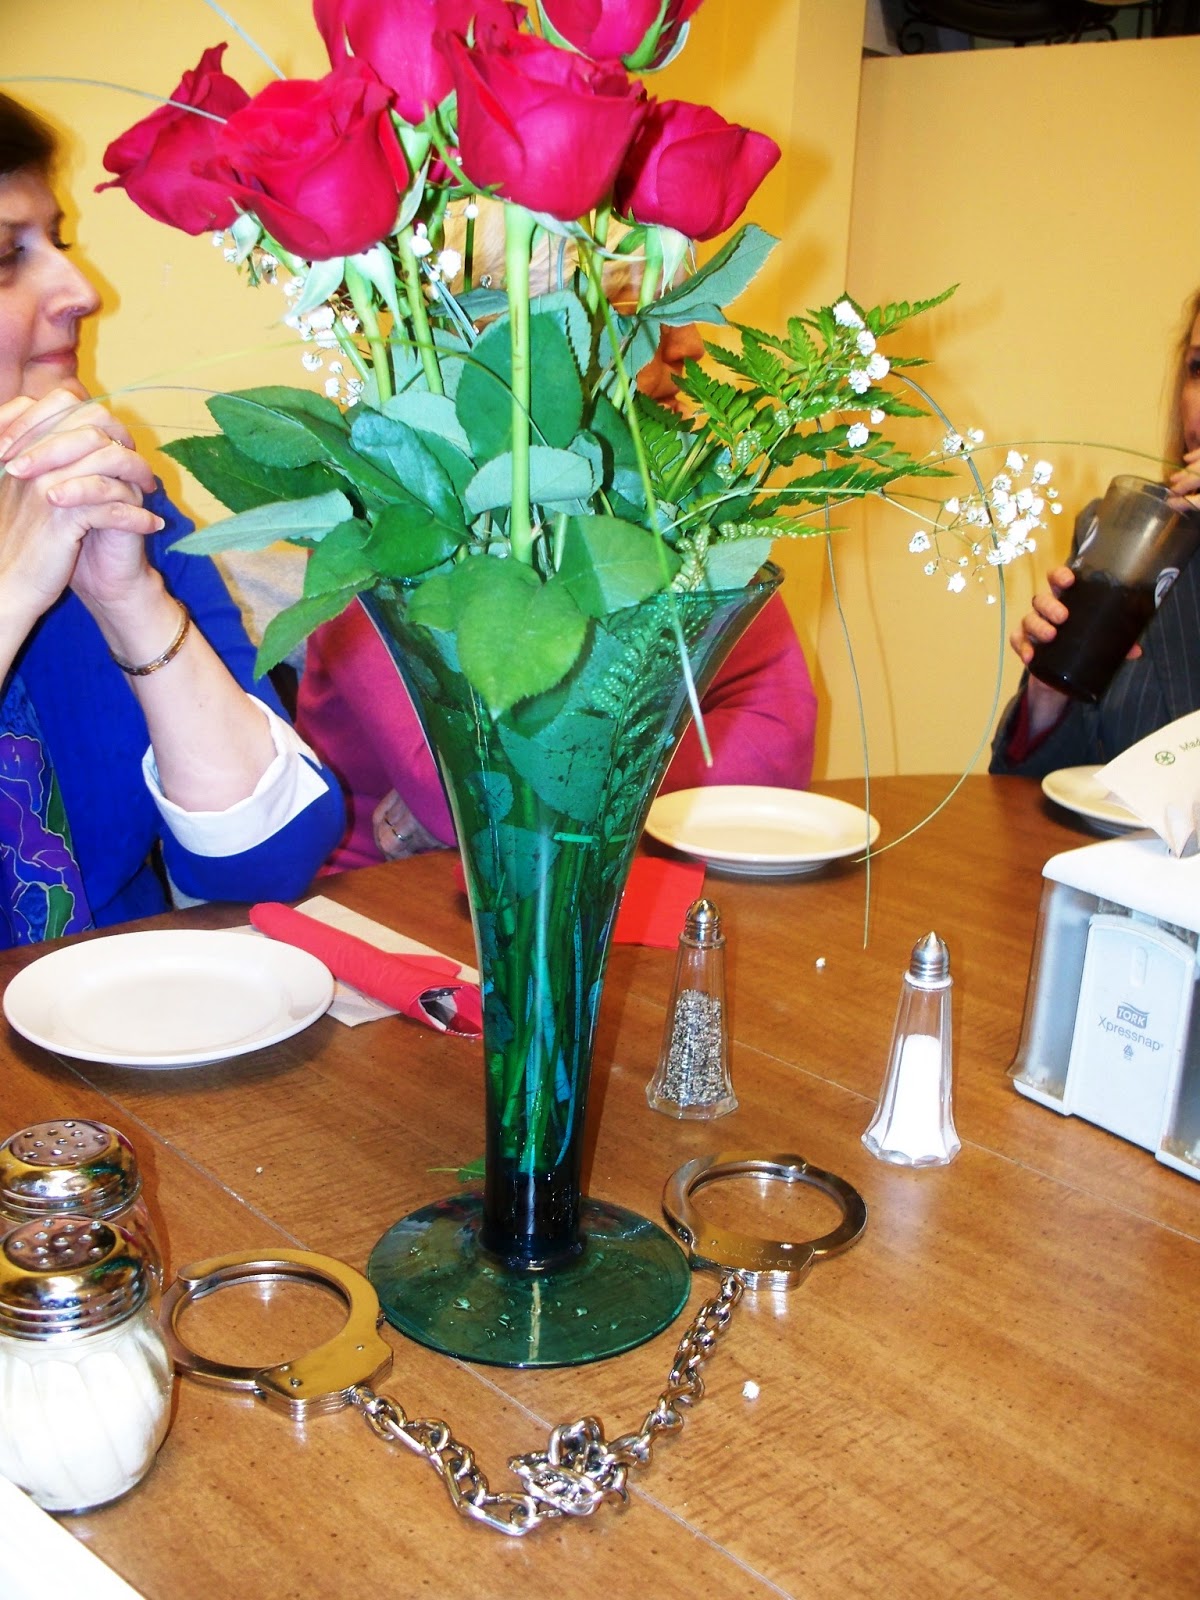
The Decor - To go along with the theme - basically a mix of love and crime - I incorporated the colors from the invite, turquoise and red, to come up with a centerpiece. All the tables had red roses in a turquoise vase surrounded by handcuffs or shackles (that the probation department kindly let me borrow for the afternoon!)
The Activity - The guest of honor wanted NO GAMES. And, of course, I listened to the bride-to-be! But we had to have something fun to pass the time and make this more than just a luncheon with presents. It was decided to have a photo booth. I'd seen photo booths at weddings, run by professionals, but as this was a lower-budget affair, the co-host and I created our own photo booth with a twist. We made a WANTED poster out of a cardboard display board. I found a bunch of crimes - some from the Ohio Revised Code that were actual crimes, and some that we just made up for fun. The "crimes" people could choose from were: Assaulting a Police Horse, Running an Illegal Gambling Ring, Hoarding Fabulous Shoes, Doing the "Footloose" Dance in a Public Place, Swearing in Front of Women and Children, Public Intoxication, Misuse of a Public Transportation System, Driving Too Slowly, Stealing Doug's (the groom's) Heart, etc. Actually, at the shower, the bride-to-be started looking through the crimes and assigned them to different people, which in itself was pretty funny. Plenty of props were around so people could be as silly as they wanted to be.
The Bonus - I edited all the photos from the shower and put them in an album for the bride as a keepsake of the day. I also posted all the photos on an online site so that all the guests could laugh at the photos. I filtered some photos in sepia tone or black and white so they would look more old-timey.
Wednesday, December 12, 2012
World's Best Vanilla Cut-Out Cookie Recipe
I have long held a love/hate relationship with cut-out cookies. I think they can be so delicious and look gorgeous, but MAN are they a lot of work and so easy to screw up. I have searched for years for the perfect cut-out cookie recipe (you know, not constantly searched, but I have tried literally SEVERAL recipes.) I am nearly bursting with jubilation to announce that perfect recipe here.
First, when searching for a cut-out cookie recipe discard anything that mentions Crisco. Butter, my friends, butter is the magical ingredient that blissfully clogs our arteries while we dream of Christmas.
Second, you need to take some time with your cookie decorations. I don't know when it became acceptable to just slap on some nasty tasting white "frosting," throw some red sugar crystals in the general direction of the cookie, and call it a day. Not on my cookie tray. Go big, or go make some rice krispie treats with my four year old. (Just kidding, but they do look nice when you take the time.)
Third, roll them out THICK. Some people enjoy really thin, crispy cut-out cookies, but those people, I feel, are the minority. A thicker, chewy on the inside cookie is going to balance the frosting better and accentuate the vanilla-y buttery deliciousness.
World's Best Vanilla Cut-Out Cookie Recipe:
from Bon Appetit December 2003 (with slight changes)
Cookies
Icing
First, when searching for a cut-out cookie recipe discard anything that mentions Crisco. Butter, my friends, butter is the magical ingredient that blissfully clogs our arteries while we dream of Christmas.
| Triple batch, baby! (Note to self: overkill - maybe double batch next year.) |
Second, you need to take some time with your cookie decorations. I don't know when it became acceptable to just slap on some nasty tasting white "frosting," throw some red sugar crystals in the general direction of the cookie, and call it a day. Not on my cookie tray. Go big, or go make some rice krispie treats with my four year old. (Just kidding, but they do look nice when you take the time.)
Third, roll them out THICK. Some people enjoy really thin, crispy cut-out cookies, but those people, I feel, are the minority. A thicker, chewy on the inside cookie is going to balance the frosting better and accentuate the vanilla-y buttery deliciousness.
World's Best Vanilla Cut-Out Cookie Recipe:
from Bon Appetit December 2003 (with slight changes)
Cookies
- 3 cups all purpose flour
- 1 teaspoon baking powder
- 1/2 teaspoon salt
- 1 cup (2 sticks) unsalted butter, room temperature
- 1 cup sugar
- 1 large egg
- 2 tablespoons sour cream
- 1 teaspoon vanilla extract (get the real stuff, not the imitation kind)
- Additional sugar
For cookies:
Sift first 3 ingredients into medium bowl. Using electric mixer, beat butter and 1 cup sugar in large bowl to blend well. Add egg, sour cream, and vanilla; beat 1 minute. Beat in dry ingredients in 2 additions until just blended. Gather dough together; divide in half. Flatten each half into disk; wrap in plastic and chill 1 hour. (Can be made 1 day ahead. Keep chilled. Soften dough slightly at room temperature before rolling out.)
Line 2 baking sheets with parchment paper. Sprinkle work
surface and top of dough disks with additional sugar. Working with 1 disk at a
time, roll out dough to no less than 1/4-inch thickness. Dough may be very soft and sticky, so roll out the dough between two pieces of wax paper or parchment paper. Using
assorted 2- to 3-inch cookie cutters, cut out cookies. Transfer to prepared
sheets, spacing 1 inch apart. Gather scraps and roll out on sugared surface; cut
out more cookies. Repeat until all dough is used. Chill all cookies on baking
sheets at least 15 minutes and up to 1 hour.
Preheat oven to 350°F. Bake cookies, 1 sheet at a time,
until very light golden appears just at bottom edges, about 11 minutes. Transfer cookies to racks and
cool completely.
- 4 cups (or more) sifted powdered sugar (sifted, then measured)
- 3 tablespoons (or more) whole milk
- 1/2 teaspoon vanilla extract
- (I also add 1/2 teaspoon of almond extract)
- Colored sugar crystals, sprinkles, and/or decors
For icing:
Combine 4 cups powdered sugar, 3 tablespoons milk, and vanilla in medium bowl. Stir until icing is well blended, smooth, and spreadable, adding more milk by teaspoonfuls if too thick or more sugar by tablespoonfuls if too thin. Use a food coloring gel, such as Wilton's, and stir a tiny bit into a portion of your icing to make a pretty color. Using small icing spatula or table knife, spread thin layer of icing atop each cookie. If using colored sugar crystals, sprinkle over cookies before icing sets. (Can be made 3 days ahead. Store airtight between sheets of waxed paper at room temperature.)
HOSTESS TIPS
1. Don't make your icing colors too bright. A pastel blue is nice, but some people are turned off by a dark blue frosted cookie. You just know it is going to give you blue teeth!
2. When decorating, get a bottle of those rainbow jimmies. They are great for giving eyes to your snowman or Santa.
3. You can freeze the cookies frosted or unfrosted, but sometimes the frosting gets a little blotchy in the freezer. They will still taste awesome and it's not like those tiny imperfections would prevent anyone from eating them. You really can't tell at all on the ones with lots of sprinkles, but if you look closely at the plain iced cookies, you may see a couple imperfections after they come out of the freezer - such as a couple spots that are a shade lighter. If you want perfect, freeze the unfrosted cookies if you need to, then decorate them just a day or two before you need them. Store in an airtight container.
4. Red food coloring added to icing often just looks pink. If that bothers you, a delicious fix is to put some red colored sugar over the top of the pink icing. You can see that effect on the cookies in the picture above.
5. Cookie pans. I highly recommend using a light-colored alumnium cookie sheet. Use parchment paper so your cookies don't stick. The cookies are very fragile when they first come out of the oven.
6. This is the same recipe I used to make the wedding favor cookies in this post. But I used royal icing to decorate those. Although royal icing arguably does not taste as good as the icing in this post, it gets really hard. This quality makes it ideal for wedding favors because it dries quickly and the colors don't run much.
Thursday, November 8, 2012
A Party at the End of the World
There has been a lot of speculation that the world will end on December 21, 2012. This belief is based on the calculation that a calendar made by the Mayans literally ENDS on that date.
So, what better way to spend the last day of our existence than to have a rocking party, surrounded by our friends? It's the last day to confess our transgressions, tell our friends how much we love them, and drink one last glass of scotch before God knows what disaster will happen on the morrow.
Note that December 21, 2012 is a Thursday, but most people probably won't mind attending a mid-week party. Just start a little earlier than usual. I mean, it's the LAST DAY OF THE WORLD, so it's not like anyone will have to go to work in the morning anyways.
FOOD - Well, for once in our lives, calories REALLY don't count. So you might as well indulge. I'm thinking cheesecake, and sausages wrapped in bacon, and caviar. NO veggie trays in sight. Is there a food you always thought you should try before you die? Order some of that for the party.
BEVERAGES - You might as well drink whatever you want because the best thing about the world ending is that you don't have to worry about a hangover. Yay!
ACTIVITIES - Maybe you could play the old party game "I Never". It seems really poignant now doesn't it? Thinking that if you have to drink because you "never" did something, you really will never get a chance to do it now? (To think my life is over and I never got a tattoo in a naughty place. Sigh.) Or maybe everyone has to make an end of the world confession. They can have the chance to get some secret off their chest before the earthquakes, meteor, floods, and/or lava destroy the earth tomorrow.
PLAY LIST - Okay. I worked a long time on this. I think I have most of the Apocolypse-related music here. Let me know if I missed any songs we should play before the world ends.
"It's the End of the World As We Know It (And I Feel Fine)"- REM
"1999"- Prince
"Until the World Ends"- Britney Spears
These songs are more on the funny/ironic side -
So, what better way to spend the last day of our existence than to have a rocking party, surrounded by our friends? It's the last day to confess our transgressions, tell our friends how much we love them, and drink one last glass of scotch before God knows what disaster will happen on the morrow.
Note that December 21, 2012 is a Thursday, but most people probably won't mind attending a mid-week party. Just start a little earlier than usual. I mean, it's the LAST DAY OF THE WORLD, so it's not like anyone will have to go to work in the morning anyways.
HOSTESS IDEAS
ATTIRE - If this really is the last day of your life, what do you want to wear? I say, tell the guests to wear whatever clothes they want to wear once more before the END OF TIME. For me, this is going to be a fabulous floor-length gown, probably a boa, and definitely my wedding tiara. For my husband, it is going to be his jammies.FOOD - Well, for once in our lives, calories REALLY don't count. So you might as well indulge. I'm thinking cheesecake, and sausages wrapped in bacon, and caviar. NO veggie trays in sight. Is there a food you always thought you should try before you die? Order some of that for the party.
BEVERAGES - You might as well drink whatever you want because the best thing about the world ending is that you don't have to worry about a hangover. Yay!
ACTIVITIES - Maybe you could play the old party game "I Never". It seems really poignant now doesn't it? Thinking that if you have to drink because you "never" did something, you really will never get a chance to do it now? (To think my life is over and I never got a tattoo in a naughty place. Sigh.) Or maybe everyone has to make an end of the world confession. They can have the chance to get some secret off their chest before the earthquakes, meteor, floods, and/or lava destroy the earth tomorrow.
PLAY LIST - Okay. I worked a long time on this. I think I have most of the Apocolypse-related music here. Let me know if I missed any songs we should play before the world ends.
"Until the
End of the World"- U2
"It's the End of the World As We Know It (And I Feel Fine)"- REM
"1999"- Prince
“Learn to Fly” - Foo Fighters
"Until the World Ends"- Britney Spears
"The
End" - The Doors
"Five Feet High and Risin'” - Johnny Cash
"When the Levee Breaks" - Memphis Minnie/Led Zeppelin
"So Long It's Been Good to Know You" - Woody
Guthrie
"Black
Diamond Bay "
- Bob Dylan
“Flirtin’ with Disaster” - Molly Hatchet
“Apocalypse Please” – Muse
“The Day the Whole World Went Away” – Nine Inch Nails
“London
Calling” - The Clash
“99 Red Balloons” – Nena
“Bad Moon Rising” - Credence Clearwater Revival
“King of the World” - Steely Dan
“1812 Overture (Finale)” - Tchaikovsky
“I Don’t Want to Wait
(For our lives to be over)” - Paula Cole
“The Final Countdown” - Europe
“Death is Not the End” - Nick Cave
and the Bad Seeds (by Bob Dylan)
“I Don’t Wanna Miss a Thing” – Aerosmith
“Highway to Hell” - AC/DC
“End of the Road” - Boyz 2 Men
“The End of the World” – Skeeter Davis
“Nothin’ But Flowers” – Talking Heads
“When the World Ends” - Dave Matthews Band
“Rapture” – Blondie
“Black Hole Sun” - Soundgarden
“Hard Rain’s Gonna Fall” – Bob Dylan (but love the Edie
Brickell version)
“Gimme Shelter” - Rolling Stones
“O Fortuna” – from Carmina Burana (Carl Orff)
“Always Look on the Bright Side of Life” – Eric Idle
“Get Happy” – Judy Garland
“Come Sail Away” – Styx
“Apocolypso” – Jimmy Buffett
“Tomorrow” – from Annie
“Let it Be” – the Beatles
“Adios and Vaya Con Dios” – Zac Brown Band
“I’ll Fly Away” – O Brother Where Art Thou soundtrack
“Last Dance” - Donna Summer
“People Get Ready” – I love the Ziggy Marley version
“Wastin’ Time” – Kid Rock
“The End” – The Beatles
Sunday, October 28, 2012
Kate's Monster Cookies
Some foods take on a legendary status in families. For my family those foods include Dad's chili, chicken paprikas, Mom's cheesecakes, and most importantly Monster Cookies.
Monster Cookies entered our lives sometime around 1990 through a recipe my Grandma Emily discovered. The recipe was actually called "Kate's Monster Cookies", so I knew they were meant for me. We never looked back. If my friends knew two things, it was that they were always welcome at my parents' house, and that there would always be Monster Cookies.
When I moved away for college, the recipe for Monster Cookies came with me. I made a slight variation to our original recipe - less white sugar. The variation was made by mistake, but as the taste and consistency of the cookies was actually improved, the variation became the law. My college roommates couldn't get enough of these beloved "Monsters". Later, my co-workers demanded that I make them again and again and begged for the recipe. I'm really not over-selling these cookies to you. They are, quite simply, the best cookie ever. These cookies have oatmeal, peanut butter, chocolate chips, and M&Ms. There are chewy and crunchy. They are alpha and omega. They are ying and yang.
Hope you love them as much as I do.
KATE'S MONSTER COOKIES
makes 7 DOZEN (And don't even think about halving this recipe. You will want them all. Plus, they freeze really well.)1 C (two sticks) unsalted butter
2 1/4 C creamy peanut butter
2 1/4 C brown sugar
2 Tbsp sugar
6 eggs
1 1/2 tsp vanilla
1 tsp light corn syrup
1/2 C flour
1 Tbsp baking soda
9 C Quick Quaker Oats
2 C M&Ms
2 C chocolate chips
In a large mixing bowl with an electric mixer, cream butter, peanut butter, brown sugar and sugar. Mix in eggs, one at a time. Add vanilla and corn syrup and mix until blended.
In a separate bowl, mix the flour and baking soda together.
Add the flour mixture to the batter.
Add the quick oats, one cup at a time. Mix at the lowest speed. The mixture will start to really fill up your mixing bowl. The more you can do with the electric mixer though, the better, because the dough is very thick and difficult to stir by hand.
Add M&Ms and mix at low speed. Add chocolate chips and mix. Mix in by hand if you have to/want to.
Refrigerate dough for one hour.
Preheat oven to 350 degrees.
Roll dough into 1.5 inch balls. Place on ungreased cookie sheet, one inch apart. Bake for 11-12 minutes at 350 degrees. They are done when you just start seeing a little golden brown on the tops of the cookies. Let cookies sit for a minute on the pan, then carefully transfer to a wire rack to cool.
TIPS
1. Refrigerate the dough between batches.
2. If the dough is too sticky for your liking while you are rolling them into balls, add a little flour. But don't go overboard adding extra flour or the taste will be adversely effected. My hands are absolutely covered with sticky dough when I am rolling the dough into balls, so don't be surprised by that.
3. Take the rings off your hands before shaping the dough into balls. Like I said, it gets messy.
4. Use RED and GREEN seasonal M&Ms and voila! You have the perfect Christmas Cookies.
5. You can make the dough one day ahead of time and refrigerate the dough overnight in a covered bowl if you want. It takes kind of a long time to make these since the recipe makes so many cookies, so I often make half of the Monsters one day, and finish them up the next day.
6. These cookies do not break easily, so they are the best kind of cookie to make and ship to friends. If you know anyone in college, they are a wonderful study food - you get the sugar rush plus all the protein from the peanut butter.
7. Do not over bake. They should be a bit chewy inside.
Wednesday, September 12, 2012
The Night the Baby was Conceived...
I was at a charming baby shower over the weekend for a darling young woman. She's one of those pregnant ladies with a PERFECT pregancy shape. No bloating, no cankles, just a round little baby bump that looks like she has a honeydew melon under her shirt or something. (Unlike me, who looked like a beached whale from seven months on. But I digress.)
At the shower they had a fun little activity that made everyone giggle. I thought I would pass it on because it was just hysterical. And it only takes a few minutes to do.
BABY SHOWER ACTIVITY - PILLOW TALK
One host or guest secretly writes down all the things the mom-to-be says while she is opening her presents. After the presents are opened, the host explains to everyone that the comments were what the mom-to-be said the night the baby was conceived. All the comments should be read out loud to the group. The innuendos can be hilarious!
Obviously don't introduce this activity to a group who would be offended by the joke, but at the shower I attended, there were a bunch of the mom-to-be's friends, as well as a few older relatives, and everybody thought it was great.
Here's the list from that party, just so you can get an idea:
At the shower they had a fun little activity that made everyone giggle. I thought I would pass it on because it was just hysterical. And it only takes a few minutes to do.
BABY SHOWER ACTIVITY - PILLOW TALK
One host or guest secretly writes down all the things the mom-to-be says while she is opening her presents. After the presents are opened, the host explains to everyone that the comments were what the mom-to-be said the night the baby was conceived. All the comments should be read out loud to the group. The innuendos can be hilarious!
Obviously don't introduce this activity to a group who would be offended by the joke, but at the shower I attended, there were a bunch of the mom-to-be's friends, as well as a few older relatives, and everybody thought it was great.
Here's the list from that party, just so you can get an idea:
Thursday, July 19, 2012
Easy Fruit Pizza - Delightful!
Looking for the perfect summer pot luck dish or bridal shower snack? Fruit pizza is a hit with the very old, very young, and everyone in between. As a guest, I always a appreciate when there is something sweet on the appetizer table. I really cannot wait all the way until dessert is served to get a sugar fix, you know? And fruit pizza is just appetizer-y enough that it fits right in with the apps. Of course, if you have the willpower to wait, it makes a light and refreshing dessert.
I first made Fruit Pizza at Camp Libbey Girl Scout camp during the summer of my 12th birthday. (Man, sometimes I wish I could go back to carefree summers like that one.) Fruit Pizza just a really fun thing to cook, and if you have kids, they will like to help you in the kitchen for this one.
You can choose the fruit based on what is in season and what your family likes, BUT make sure the fruit is not too watery. After you wash the fruit and cut it to a good size, let the fruit sit on a paper towel for a few minutes so the fruit has a chance to dry. If you use bananas or apples, make sure you serve the dish right away before things turn brown. I put the fruit I chose into the recipe below, but substitute whatever!
RECIPE (revised from the Kraft web site)
1 pkg.
(16.5 oz.) refrigerated sugar cookie dough
1 pkg.
(8 oz.) Cream Cheese, softened (can soften for 10 seconds in the microwave)
3 Tablespoons sugar
1/2 tsp.
vanilla
1 pint strawberries cut in half
1 pint blueberries
24 raspberries
2 kiwi fruits, sliced
HEAT oven to 375°F or baking temperature directed on the refrigerated sugar cookie dough.
LINE 12-inch pizza pan with foil; spray with cooking spray. Press cookie dough into prepared pan to form pizza crust. Bake 14 min.; cool. Invert onto plate; carefully remove foil. Turn crust over.
Meanwhile... MIX cream cheese, sugar, and vanilla until well blended. Spread over crust after crust cools.
CUT the crust. (Yes, cut it BEFORE adding fruit and the finished product will look better.)
TOP with fruit. (You can serve it right away, or keep it in the fridge until you are ready to serve.)
Number of servings depends on how big you cut the pieces. I got about 16 pieces.
LINE 12-inch pizza pan with foil; spray with cooking spray. Press cookie dough into prepared pan to form pizza crust. Bake 14 min.; cool. Invert onto plate; carefully remove foil. Turn crust over.
Meanwhile... MIX cream cheese, sugar, and vanilla until well blended. Spread over crust after crust cools.
CUT the crust. (Yes, cut it BEFORE adding fruit and the finished product will look better.)
TOP with fruit. (You can serve it right away, or keep it in the fridge until you are ready to serve.)
Number of servings depends on how big you cut the pieces. I got about 16 pieces.
Wednesday, July 11, 2012
Olympics Party Ideas
So, it's party time again. This time, it's a London Olympics themed birthday party for yours truly. My birthday is during the Olympics!!!!! That's too fun to miss. But you can have a London Olympics party at your house, whether it's your birthday or not. Here are some ideas.
1. English food - I'm thinking Cornish pasties (made ahead of time and frozen for easy party prep), Welsh rarebit (look it up - it's not rabbit, it's basically cheese fondue), and Pan Haggerty (potatoes, cheese, and onions - the perfect side dish!). You could always serve some English cheese with chutney and table water crackers as an extra appetizer. Add some scones or shortbread if you need something sweet! English beer (Boddington's, Newcastle) would be a nice addition. Or maybe go with an "around the world" approach to beer and get a six pack from imports of several different countries.
2. The GAMES - Have your own mini Olympics. Here are some event ideas to get you started:
Beerathalon – Contestants will drink a 12 oz beer and then run approximately 1/10 mile to the finish line. First person to cross the finish line gets the gold.
Pistol – Competitors will use Super Soaker water guns to try to knock a ball off of a traffic cone from a distance. To add a challenge, the competitors will simultaneously be shot with water guns from spectators as they try to hit their target. First one to knock the ball off the cone wins. May require several elimination rounds to determine the gold medalist. (Competitors may want to bring an extra shirt to the party.)
Greco-Roman Arm Wrestling – Men and Women will have separate competitions. Opponents will face off across a table at the ancient sport of arm-wrestling. All competitors may be given a toga to wear during competition. May require several elimination rounds to determine the gold medalist.
Rhythmic gymnastics – Athletes will be given a ribbon on a stick and must make up and perform a short rhythmic gymnastics routine to music that may be chosen ahead of time by the competitor (or will be chosen by the host on the day of the party). Routines may contain various gymnastic moves and ribbon tricks. Points for creativity, form, choreography, and use of the ribbon. Points will be deducted for dropping the ribbon, cursing, and stepping out of bounds. Highest score wins.
3. Judges/Refs - Some people at the party need to be judges and referees. Recruit people if they won't volunteer.
4. The Awards - So, the winners have to get something, right? Make gold medals or give out some other gold prize to the winners (Gold Tequila?) You might choose a "national anthem" for each contestant and play it if they win. My personal anthem would be "Power of Love" by Huey Lewis and the News. (Don't you dare judge me.)
5. The Actual Olympics - You've gotta have the Games playing on a couple TVs. NBC promises great coverage this year. Maybe even get a projector to have them play on the side of your garage for some fabulous outdoor viewing. Leave out some rules for Olympic drinking games. (Examples: every time they play the Olympic theme song you drink, every time a commentator makes a really obvious observation you drink, every time you pick the winner all the other people in the room have to drink.)
6. Decorations - Clearly, you've gotta have Olympics rings on everything. Also, flags of other countries would be great decor. I like DIY water bottle labels to bring your theme to the people. And be sure to label the bar the "Official Bar of the 2012 Olympic Games" and the bathroom "The Official Bathroom of the 2012 Olympic Games."
Party like an Olympian!!
Wednesday, October 12, 2011
Inexpensive (but Thoughtful!) Wedding Favors
Favors are a great way to let guests know that you appreciate their love and support on your wedding day. And let’s be honest about the other reason brides like to provide favors – they can make your tables look really cute! But there is no need to spend a fortune on wedding favors. I mean, you are already providing entertainment, feeding these people, and probably offering alcohol.
The point of this post is to give the brides-to-be some suggestions for sweet favors that won't break the budget. I have to preface this list by saying that FOOD is probably the most guest-preferred wedding favor. You would think that people would get enough food at the reception, but no. I work at weddings almost every weekend and everyone always consumes their edible favors practically the moment they sit down. (And if for some reason they don’t eat their favors and leave them on the table, the catering staff pockets them after everyone leaves.)
Here's one of 200 cookies I made for a friend's wedding, featuring the couples' initials.
They weren't "JK" about their love. Photo by Sandy Chang
CHEAP, THOUGHTFUL, and CUTE WEDDING FAVORS
1. A small pack of recipe cards containing family recipes from the bride’s side and the groom’s side of the family. You only need to make one packet per family, instead of one per person. Use your wedding colors in your paper choices, and maybe the same font you used for your invitations and/or place cards.
2. Homemade cookie or chocolate covered pretzel in a glassine bag, tied with a ribbon. Label it if you want to: “How Sweet of you to come to our wedding.” Note that personalized, individually iced cookies take A LOT more time and effort than making a batch of bar or ball cookies. And iced cookies don’t freeze as well, so you probably need to make them no more than a few days before the wedding. So, factor that into your decision about what type to make.
3. A pack of seeds, and label it with a fitting verse and your wedding date. I like this quotation: "All the flowers of all the tomorrows are in the seeds of today." - Chinese Proverb. How appropriate for a wedding, right?
4. A Christmas ornament (if a late fall/December wedding). If you have a long engagement, buy the ornaments right after Christmas for the best deals.
5. Make a donation in honor of your guests to a charity that is close to your heart. Don’t pick a controversial charity, such as to a specific political party.
6. A baggie of candy in your wedding colors, tied with a neat bow.
7. A glass votive holder with a candle. You can get the votives and holders in bulk online inexpensively. For personalization, get a pack of sticker labels from the office supply store. Type a short note of thanks, along with your names and wedding date in a pretty font and print it on all the labels. Cut a length of ribbon in your wedding color and wrap it around the candle holder. Hold the ribbon in place with one of the personalized sticker labels.
8. Small potted plants – one for each couple/family. BONUS – they double as the centerpiece. You might include a tag that explains the meaning of the flower you chose.
9. A gorgeous apple with a paper flag that says "You are the apple of my eye" attached to the stem.
10. Lip balm personalized to say "Always kiss me goodnight" or even just "XOXOXO"
Tuesday, September 20, 2011
Free/Cheap Halloween Decorations
Halloween Parties are alot of WORK. A LOT OF WORK. (Yes, I use "a lot" instead of "much" - grammer police, come get me!) But they don't have to cost a fortune. Most of the decorations you can come up with for Halloween can be homemade. You will have to weigh the value of you own time, of course, but in this economy, it doesn't make sense to pay a ton for things you will only use one weekend a year. And the thing about Halloween parties is that if you have another party next year, you don't want to bore your guests with all the same decorations two years in a row. There's nothing scary about seeing the same old ghoul year after year!
This year I made our bathroom into a BATroom. (Hahaha, chortle at the cleverness!) Superfluous number of guano jokes aside, it turned out great. The cost of decor for the entire room was $1.15. We were lucky enough to borrow the bat-shaped lights to place around the mirror, but any old Christmas lights would have been sufficient to set the scene. The idea was that bright, overhead lights wouldn't looked very bat-cave-like. If you have a strobe light, it looks cool flashing behind the shower curtain. Unplug before showering.
In the picture above you can see various black bats. I purchased one piece of black poster board for $1.15. Found a template on the interwebs for a creepy bat (try a Google Image search for "bat template" or "bat clip art".) Traced and cut out fifteen bats from the poster board. (Your hand will hurt if you cut those all out by yourself. Take frequent beer breaks or get a significant other to help you. You may actually have to bribe the significant other with beer to get them to help. Please note that the quality of cut out bats will decrease after three beers, so moderation is the key.) Hang up the bats around the room. Tape some, hang some from string for a more "flappy" look.
I also thought, if I were a bat, what would I have in my cave? The answer was a framed picture of my best friend - in a bat's case, the Count from Sesame Street - and a picture of the coolest car ever - the batmobile. Again Google Image search for the pictures, then printed them to the size I needed. I already had the frames, just replaced the pictures (Sorry, picure of Grandma, you can return after Halloween.)
So, put your mind to it and you can come up with creative Halloween decorations without the scary pricetag.
This year I made our bathroom into a BATroom. (Hahaha, chortle at the cleverness!) Superfluous number of guano jokes aside, it turned out great. The cost of decor for the entire room was $1.15. We were lucky enough to borrow the bat-shaped lights to place around the mirror, but any old Christmas lights would have been sufficient to set the scene. The idea was that bright, overhead lights wouldn't looked very bat-cave-like. If you have a strobe light, it looks cool flashing behind the shower curtain. Unplug before showering.
In the picture above you can see various black bats. I purchased one piece of black poster board for $1.15. Found a template on the interwebs for a creepy bat (try a Google Image search for "bat template" or "bat clip art".) Traced and cut out fifteen bats from the poster board. (Your hand will hurt if you cut those all out by yourself. Take frequent beer breaks or get a significant other to help you. You may actually have to bribe the significant other with beer to get them to help. Please note that the quality of cut out bats will decrease after three beers, so moderation is the key.) Hang up the bats around the room. Tape some, hang some from string for a more "flappy" look.
I also thought, if I were a bat, what would I have in my cave? The answer was a framed picture of my best friend - in a bat's case, the Count from Sesame Street - and a picture of the coolest car ever - the batmobile. Again Google Image search for the pictures, then printed them to the size I needed. I already had the frames, just replaced the pictures (Sorry, picure of Grandma, you can return after Halloween.)
So, put your mind to it and you can come up with creative Halloween decorations without the scary pricetag.
Here's a link to another of my posts with a DIY Halloween project.
Monday, September 19, 2011
Scary Blood-Spatter Halloween Decoration
Looking for a NEW cheap and terrifying Decorating Idea for your Halloween Party?
I am a huge fan of decorating for Halloween. I am also a huge fan of NOT spending a ton of money. This idea combines those two goals into one easy and fun DIY project. Enjoy!
BLOODY TARPS
Someone (Dexter? Freddy?) committed a horrible bloody murder in your basement, hallway, or garage!!! Basically these are red paint splattered lightweight plastic sheets. This decorating idea has BIG impact. The tarps can instantly transform your charming country living room into a scary warehouse murder scene. Sweet! The other awesome thing is that you can hang the tarps in front of stuff to hide it. For example, if you want to keep people out of one side of your basement (maybe so they don’t see all the junk you store down there), a tarp can be hung across the middle of the room, blocking your dirty secrets (and Christmas decorations) from sight.
Total cost: about $11.
Materials needed:
1 Quart of Blood Red Paint – go to your local hardware store and have them mix up the bloodiest red you can find.
3 large clear plastic painters’ tarps. Also available in the paint aisle. Get the cheapest quality you can find. You don’t want these things to be heavy, or they will be difficult to hang.
Paintbrush
A rubber glove – I just used an old one we had under the sink. Bonus!
Duct tape
How To
Hang up one tarp outside, or in your garage, or any appropriate painting area - well-ventilated with a lot of space. (I held up my plastic tarp by tucking the top edge under heavy stuff on a high shelf, but you could also use duct tape.). You want the tarp to be hung up while painted, and not flat on the ground, because you really want those awesome bloody drips to form. Place one of the other tarps flat on the ground underneath the hung tarp. You don’t want the ground to be covered in paint.
Dip the paint brush in the red paint and flick red paint onto the hung tarp, creating a blood splatter effect. Start in the middle of the tarp. (If you get too close to the edge, the paint might spatter off the sides, getting your yard or garage paint-splattered.) Randomly spatter paint and brush paint in a slashing motion all over the tarp. You can also write “Help” or “Beware” or “Die” in messy brushstrokes.
When it looks sufficiently bloodied, put on the rubber glove and dip your hand into the paint. Make a few bloody handprints. I liked the effect of dragging my hand across the tarp. Like the victim was trying to escape or something. (I like to think I am theatrical and not a sick, sick person.)
After the paint drips down the tarp to your liking, lay it flat to dry. Takes a few hours to dry.
Repeat the process for the other two tarps. (One tarp could be enough, depending on your party needs, but a quart is enough paint to do three tarps, and since the tarps cost about $0.79 apiece, why not do more? Go big or go home.)
Now it’s time to decorate your party space! The plastic tarps I used were so light that I could hang them by duct tape, or in places, by tucking the tarp under something heavy on a high shelf, or by poking a preexisting nail through the plastic.
When the party is over, fold the tarp gently, paint-side-in. Note that a bit of the paint may chip off in places, so when you open it next year, maybe open it outside first so you don’t get red paint chips in the house.
Caution - bloody tarps may cause guests to pretend to stab each other.
Friday, September 9, 2011
Wedding Colors - Tips, Trends, and Choices
Picking your wedding colors? It's kind of a big thing, isn't it? Color has to be decided for the bridesmaid dresses, the flowers, the napkins, cake, and the invitations, among other things. Much has changed since your mother made your father wear a powder blue tuxedo to their 1976 wedding. Read on.
The Basics of Wedding Color
Pick a color scheme and stick with it. Receptions look amazing when things are coordinated. (Note, coordinated is not the same as "matchy-matchy." Don't go totally overboard making things match.)
There are NO rules on how many colors you can have for your wedding. Go monochromatic, or have the whole rainbow. It’s entirely up to you. Also, color can be a focal point, or it can be completely understated. Either option can be totally beautiful.
The elusive "Understated Multi-color Look". So beautiful!
I would advise that you keep some white or ivory or some muted color in the decoration scheme. Some brides have brightly colored or black tablecloths and it ends up looking like a prom instead of a wedding. (Unless "Enchantment Under the Sea" is the wedding theme you are shooting for.)
So, how to choose your wedding colors?
Some brides just KNOW what colors they want, and others have a really difficult time making a decision. I've come up with several ways to choose wedding colors. Which one works for you?
1. Consider my post on choosing two wedding words and how your two words can impact your color choice. Your color can really help the mood you are trying to create for your wedding.
2. Consult your bridesmaids on what color dress they would like, or alternatively, what they would HATE. Or at least think about their skin tone/hair color when choosing a dress color. With their preferences in mind, choose a dress. Then use that dress color as the main color for the wedding, or pick one or more colors that coordinate with that color. Those colors are your official wedding colors. Good to Note: all the dresses don't have to be the same color. I saw a stunning bridal store display with alternating bridesmaid dresses in green and yellow, surrounding a white clad bride. Talk about a striking combination!
3. Look at your venue for the ceremony or reception. If the entire church is salmon colored, don’t pick bright orange for your flowers and bridesmaid dresses. Talk about clashing! Gross. If your reception is at a college, and school colors dominate the room, choose colors that are the same as those, OR that coordinate with those, OR at least don’t clash with those. The colors of your reception space could really help with the overall design of your reception, IF you work with it and not against it. For example, if your reception site has navy chairs, go with a color scheme that incorporates navy. Then there is zero need to buy chair covers and your decorations will really coordinate with the space. Also, if you are having a destination wedding, such as at the beach, go with “beachy” colors like blue, white, and tan. Or if your destination is New Orleans , think about the traditional Mardi Gras hues of purple and gold.
4. Consider the season. Great choices for particular seasons are:
· Winter
o Navy and silver
o Icy blue and white
o Crimson and green
o Green and ivory
o White and silver and ivory
o Gold and red
o Purple
o Black and white
· Spring
o Yellow and green
o Yellow and red – think tulips, not McDonald's
o Green – different shades
o Light blue and green
o Pastels – think charming English garden bouquet
o Pink
o Light blue, yellow, white
· Summer
o Bright multi-color – all the brightest summer flowers
o Red, orange, yellow, green
o Blue
o Pink and green
o Yellow and ivory
o Grey and any bright accent color
· Fall
o Brown and lime green
o Brown, orange, red/yellow
o Your football team’s colors
o Wheat and green/cream/orange/brown
o Sky blue
o Purple
o Red
If you have any more ideas on favorite color combos for a particular season, please leave them in the comments!
Good to Note - the Two-Color-Combo trend is kind of over. When you want two dominant colors, like say, yellow and blue, don't stick with one bright yellow and one shade of blue for everything from flowers to dresses to bows. Consider doing a mix of lemon yellow, pale yellow, navy, baby blue, beige, and white. This really takes your pallette to the next level in terms of sophistication.
5. Speak with a florist. Talk to your florist about what kinds of flowers she recommends, especially for the time of year of the wedding. If she can show you a must-have, fabulous bouquet for your wedding, just go with that color scheme for everything else. They have bridesmaid dresses in every single color of the rainbow, so I’m sure you’ll be able to coordinate.
6. Is there a color that is meaningful to you and your spouse? For example, the colors of the school where you met, or maybe your unique engagement rings has emeralds and you want to go with an emerald color scheme. Which color makes you HAPPY?
7. Head to the paint store with your fiancĂ© and choose a few colors that you both like. It’s not rocket science! Maybe you’ll think up some amazing combinations together. Do you want to go with pale blue, midnight blue, a swampy green, or all three?
8. Be practical. Your best friend got married last year and is willing to give you all of her red, black, and white centerpieces, candles, and gorgeous table runners. The money you will save on decorations might be enough to convince you that red, black, and white are your new favorite colors!
Charming DIY paper and cloth decorations by bride Shannon Reitz Nye gave her late
summer wedding a fun burst of color. Photo by Eileen Magno Grubb.
Subscribe to:
Posts (Atom)